
Video #
Purpose #
The Central Business Register (CBR) is used to register legal entities (businesses) to validate their details to be able to trade. To export goods to other importing countries, businesses have to capture information that is required to facilitate the process such as the business legal name, tax numbers, business addresses, billing information and supply any other supporting documentation that may be required by authorities approving the trade of their goods.
The CBR can be accessed via the URL: https://cbr.ecert.co.za
Pre-Requisites #
To register a business on the Central Business Register the user must be registered on the User Authentication Service (UAS).
If you are not already registered as a user on the UAS then please do so on the platform first, for the fruit sector this will be PhytClean or via eCert (Link Provided to Online KB)
Registering a New Business #
- Go to CBR and enter your username and password
- Click Sign me in

- Click on Register Business

- Begin the process of registering your business by following the steps below:
- Step 1: Fill in the Basic Business Details. Then press Next to continue.

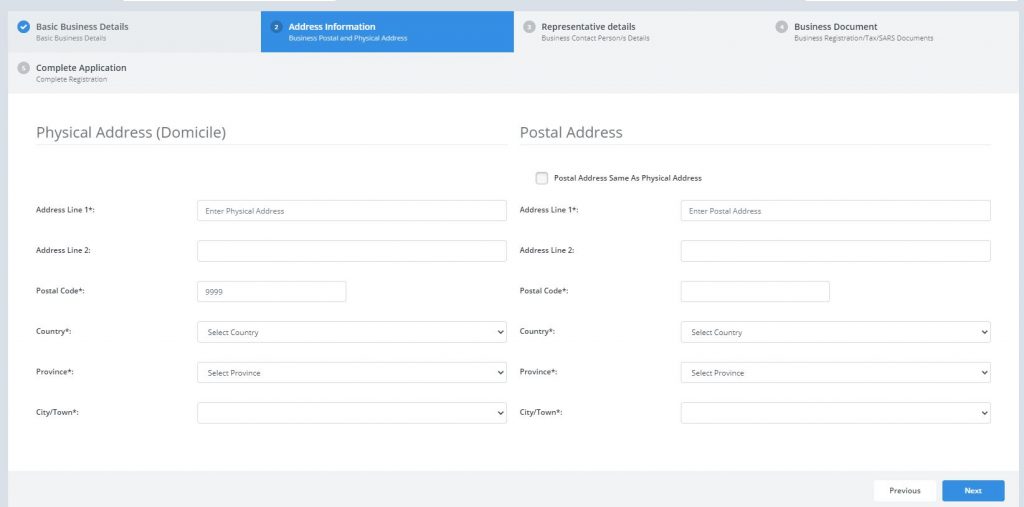
- Step 2: Complete the Address Information and press Next.
- Step 3: Complete the Representative details and press Next.

- Add your Business Documents by clicking on Choose File
- Please note: There is a 5MB limit for all of the documents uploaded. Please make sure the file uploaded is in DOC, DOCX or PDF format.

- Complete form and press Save Changes

- You will then be redirected to the My Businesses page which shows all the businesses you have added. See Figure 8
Please note:
- When you select a Province, it filters the City/Town of that province.
- All the required fields (these have * next to them) need to be filled in before you click on Save Changes.
- DALRRD Acc. No. and Business VAT No. is not a required field.

My Businesses #
Shows all the businesses that you have added.
- Please note that only business administrators can view businesses.


- To modify existing businesses that have been captured click on the My Businesses menu option
- Click on the Edit button highlighted below, in Figure 7, on the My Businesses Page.
- Update relevant details
- Click on Save Changes

Please Note:
- There is a sorting option available on each column in the grid. To initiate the sorting functionality, click on the arrows next to each heading to sort each column’s values.
- To filter, enter the search text in the search box highlighted in Figure 8. Press enter and the grid will show all businesses that contain those search criteria.

Business List #
Shows all the businesses registered on the CBR
- To search for a business, click on the Business List menu option
- Type in either the business name, registration number, income tax number or business status
- Click Search to view the business
- Use the Clear button to clear the business search


Please Note:
- There is a sorting function that can be initiated by clicking on the arrow next to each heading. For example, you can click on the arrows next to the Business Name heading to sort the list of businesses by business name.
These tools are available on each page and perform the following functions:


Manage Business Users #
This section provides a step-by-step process on how to manage users and assign permissions for a business in the Central Business Register (CBR). Initially, there is only one business administrator, the user who creates the business but businesses have the option of adding multiple administrators.
Please note:
- Only Business Administrators can manage and assign permissions to other users
- Click on Manage Business Users

- The Business Users Management page opens as shown below in Figure 13

- On the Business User Management Panel supply the information as follows:
- Use the dropdown arrow to select a business for which you want to add users from the dropdown list.
- Type in the email address for the new user
- Then click Add Business User

Please note:
- Only users registered with the User Authentication System (UAS) can be added as business users. An error pops up if the user is not registered.
- Once a new user has been successfully linked to a business, they are now listed in the List of Users linked to the business panel as shown in Figure 15.

- The administrator can assign administrator permissions to another user by checking the Is Admin? checkbox as highlighted in the figure below:

Please note:
- All business administrators have permissions to change the business details and add new business users.
Business FBO’s #
This section allows businesses to see which FBO’s they linked to on PhytClean.
Please Note:
- For the business to see which FBO it’s linked to. The business will have to be linked on PhytClean Platform.
- Click on Business FBO’s
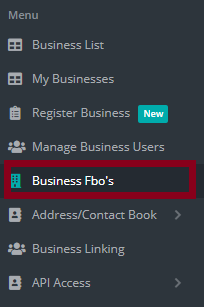
- Use the dropdown arrow to select a business for which you want to see the FBO’s that are linked.

- Once the business is selected from the dropdown the list of FBOs which are linked to the business will be displayed.

Business Contact/AddressBook #
This feature is for the capture of business contacts such as consignee’s and consignor’s to be used in the eCert application when applying for a Phyto certificate.
Add New Contact #
- Click on Address/Contact Book
Add New Contact #
- Click on the Add New Contact menu item. This will open a screen as below

- The Business Contact Management page opens as shown below in Figure 21.

- Mandatory Fields:
- Business
- Contact Type
- Name
- Address Line 1
- Address Line 2
- Address Line 3
- Once all the information has been captured click on Save Changes button.
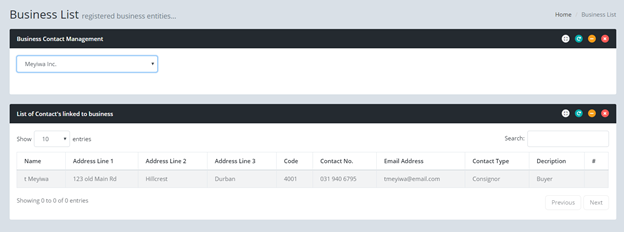
View Business Contacts #
- Click on View Business Contacts
- The consignor or consignee address will be displayed as shown in Figure 22
- Use the dropdown arrow to select a business for which you want to view the business contacts from the dropdown list.

- Once your business has been selected from the dropdown the contacts that have been captured against the business will be displayed.

- Once your business has been selected from the dropdown the contacts that have been captured against the business will be displayed.
/
Business Linking #
This is an optional feature which enables different freight forwarding agents/businesses to link to a central business.
- Click on Business Linking

- Select the name of the business that you want to link to using the drop-down arrow on your LHS.
Please Note:
- You will only see businesses which you are an admin user for when selecting a business from the LHS drop-down list

- Use the drop-down arrow on your RHS to select the business which you are linking and then click Link To Business

- Click Link to Business

- A success message will appear on your top RHS stating that the business has been successfully linked

Video (Business Linking) #
API Access #
This feature enables the user to request or view their business’s API access details. This feature is optional and required if you use a Vendor System to submit via the backend.
Request API Access #
- Click on API Access
- Click on Request API Access

- Select the name of the business from the drop-down list.
- Read the Terms and conditions.
- Tick the Declaration box
- Click on Request Access

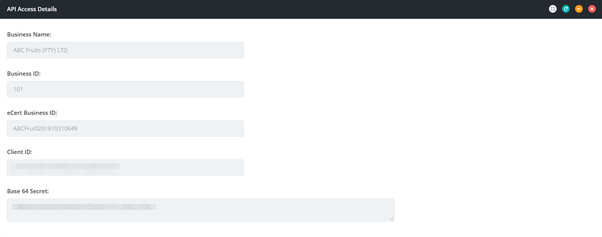
- The API credentials will be displayed as shown below
Please Note:
- If the API credentials have been requested before a warning message will appear stating that the client already exists
View API Access Details #
- Click on View API Access Details

- A list of businesses which you are admin for will appear under “My businesses”
- Click on the search icon on your LHS for the company whose API details you want to view.

- API Details will appear under API Access Details, See figure 34
